> ## Documentation Index
> Fetch the complete documentation index at: https://docs.presenton.ai/llms.txt
> Use this file to discover all available pages before exploring further.

# Templates

> Turn your branded PowerPoint presentation into a reusable template for Standard presentations.

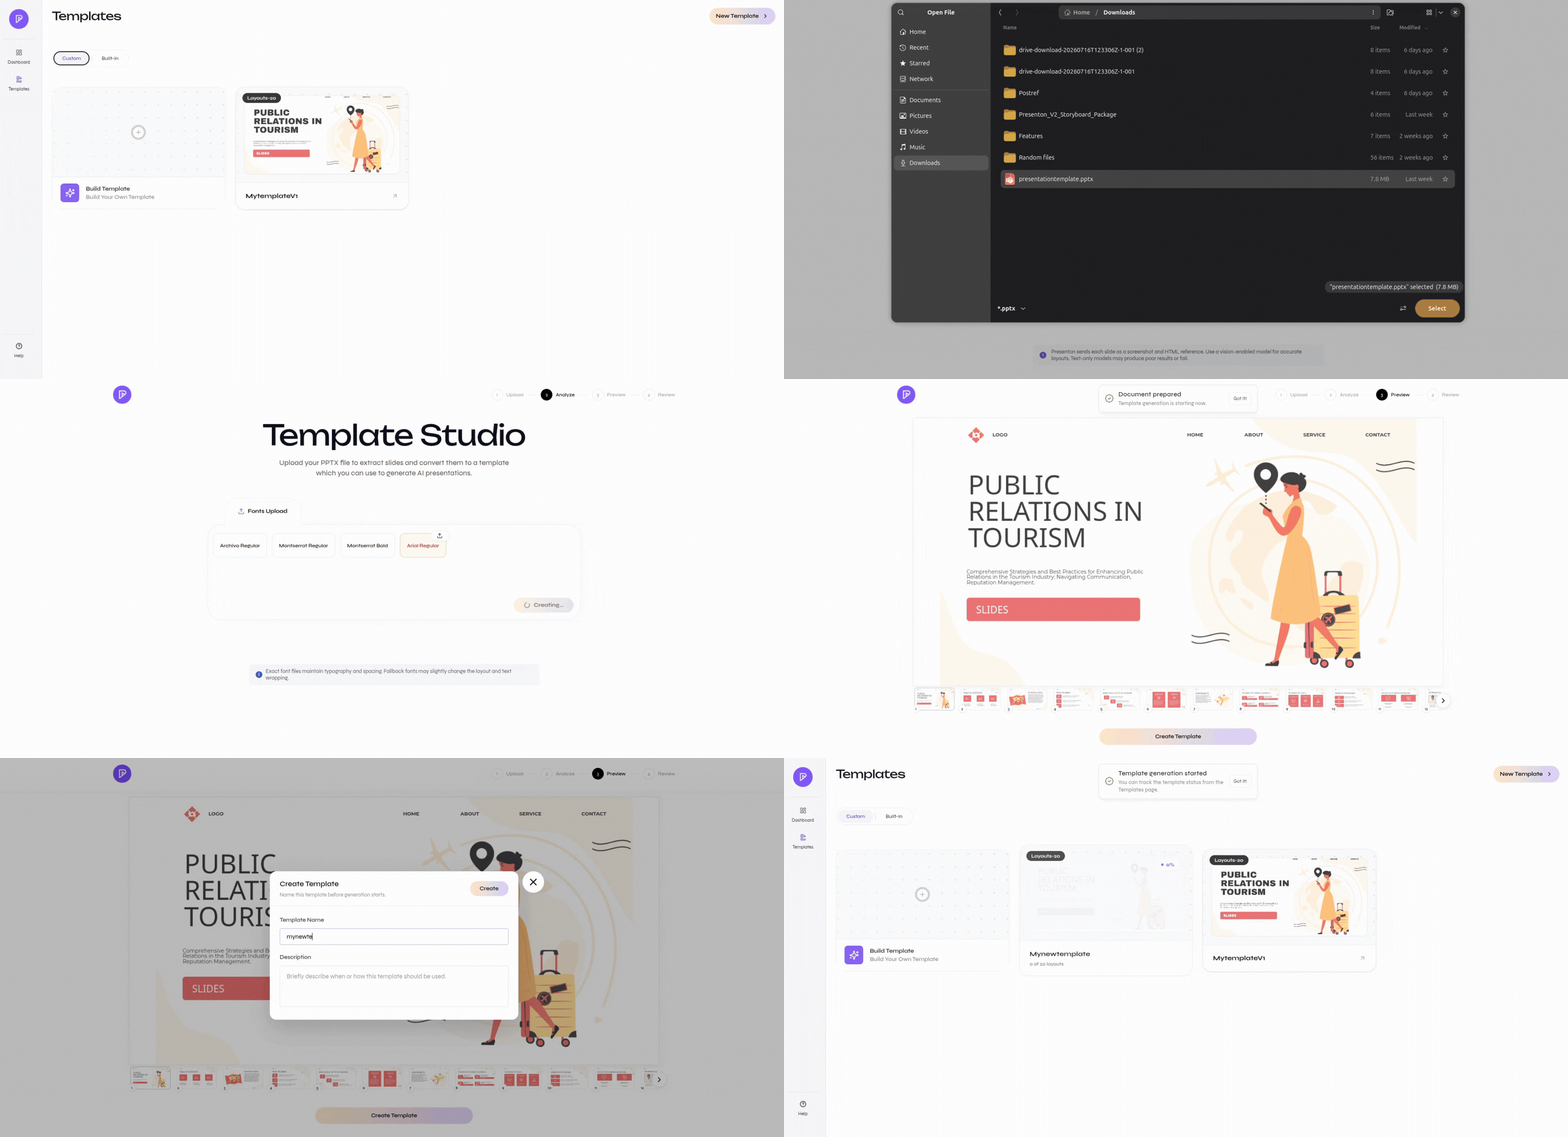
Templates let Presenton generate new presentations in an existing brand design. Use **Template Studio** to convert your own filled PowerPoint presentation into a reusable custom template.

Each slide in the uploaded PPTX can become a reusable layout. Presenton analyzes the slide structure, text fields, images, and other editable regions so new content can be placed into the same design.

<div className="guide-media guide-media--workflow">
  <p className="guide-media-label">Turn a branded PowerPoint presentation into a reusable template</p>

  <div className="guide-media-viewport">
    <img src="https://mintcdn.com/presenton-521d9e2f/isevrd3o6JPIkznF/images/templatecreation.gif?s=09c23e3ae3752c4f91b57d8b8b7a2007" alt="Complete workflow for converting a PowerPoint presentation into a reusable template with Template Studio" width="1892" height="917" data-path="images/templatecreation.gif" />
  </div>
</div>

## What a branded template preserves

A well-prepared custom template helps generated presentations reuse:

* Branded slide layouts and composition
* Typography and text hierarchy
* Image, chart, table, and content regions
* Repeated visual elements and spacing
* Layouts for titles, sections, content, data, and closing slides

Templates control slide structure. Themes separately control presentation-wide colors, fonts, and logos.

| Branding need                                         | Use               |
| ----------------------------------------------------- | ----------------- |
| Reuse the layouts from an existing PowerPoint design  | Custom template   |
| Apply colors, fonts, and a logo across a presentation | Custom theme      |
| Start from a design supplied by Presenton             | Built-in template |

## Prepare the source PowerPoint

Upload a filled `.pptx` that represents the brand and includes the slide types you want Presenton to reuse.

* Include real sample content instead of empty placeholders.
* Add one or more distinct examples of each required layout type.
* Remove obsolete, confidential, and duplicate slides.
* Keep custom font files available for upload.
* Check that logos, images, and other brand assets are clear and correctly positioned.
<Warning>
  Do not use an empty PowerPoint master as the source. Template Studio learns from the content and structure of filled slides. Missing or near-duplicate examples can produce incomplete or unreliable layouts.
</Warning>

## Create the branded template

<Steps>
  <Step title="Open Template Studio">
    Open **Templates**, then select **Build Template** or **New Template**.
  </Step>

  <Step title="Upload the branded PPTX">
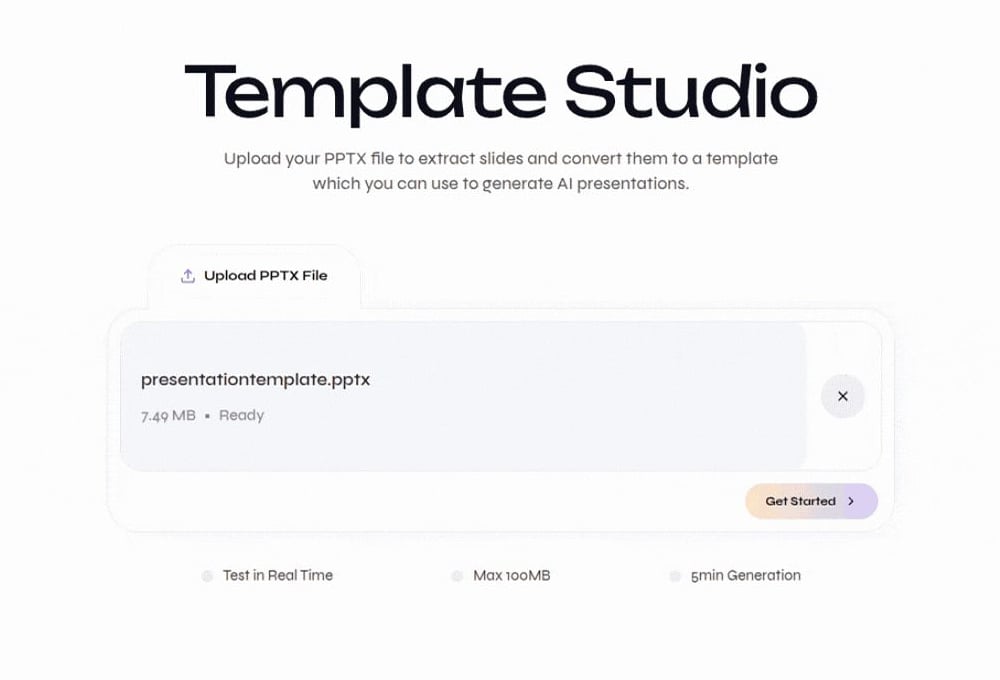
    Select **Upload PPTX File**, choose the source presentation, and wait for it to become **Ready**. Select **Get Started**.

    <div className="guide-media guide-media--detail">
      <p className="guide-media-label">Upload a branded PowerPoint presentation</p>

      <div className="guide-media-viewport">
        <img src="https://mintcdn.com/presenton-521d9e2f/oSISzG16Qh-yjB8A/images/user-guide/template-creation/closeups/upload-pptx.png?fit=max&auto=format&n=oSISzG16Qh-yjB8A&q=85&s=f89b8b269a963460e2c642cdcfa132fd" alt="Close-up of Template Studio with an uploaded PowerPoint presentation ready for processing" width="1000" height="680" data-path="images/user-guide/template-creation/closeups/upload-pptx.png" />
      </div>
    </div>
  </Step>

  <Step title="Resolve the presentation fonts">
    Review the detected fonts and upload any missing font files. Correct fonts are required for reliable text measurement, wrapping, and layout fidelity.
  </Step>

  <Step title="Review the source slides">
    Inspect the thumbnails and slide preview. Confirm that the deck contains the branded layouts you want to reuse, then select **Create Template**.
  </Step>

  <Step title="Name and describe the template">
    Use a recognizable brand and use-case name. Add a description that explains when the template should be selected, then select **Create**.
  </Step>

  <Step title="Wait for layout generation">
    The template appears in the **Custom** library while Presenton converts the source slides into reusable layouts. Wait for generation to finish before using or editing it.
  </Step>
</Steps>

## Refine the generated layouts

After creation, open the template and review each generated layout in the Template Editor.

* Edit sample text and confirm the intended typography.
* Set realistic minimum and maximum character limits in **Schema**.
* Test Low, Medium, and High content density.
* Use **Re-Construct** if a slide is blank, incomplete, or incorrectly constructed.
* Check layout names and descriptions under **Layouts**.
* Save after reviewing the edited slides and metadata.

<CardGroup cols={2}>
  <Card title="Template creation" icon="wand-magic-sparkles" href="/user-guide/template-creation">
    Follow the full Template Studio upload and creation workflow.
  </Card>

  <Card title="Template Editing" icon="layer-group" href="/user-guide/editing-and-refining/template-editing">
    Refine schemas, text behavior, reconstruction, and layout metadata.
  </Card>
</CardGroup>

## Validate the brand result

Before making the custom template the default choice for repeated work:

1. Generate a short Standard presentation with realistic content.
2. Confirm Presenton selects appropriate layouts for different slide purposes.
3. Check font rendering, text overflow, image placement, spacing, and logo treatment.
4. Export both PPTX and PDF.
5. Open the exports in the applications your audience will use.

<Tip>
  A smaller collection of distinct, dependable branded layouts is more useful than a large collection of near-duplicate slides.
</Tip>

<Note>
  Custom templates apply to Standard presentations. Cloud Smart presentations use Smart designs rather than Standard template layouts.
</Note>
